


Using the Jero Ep Single Jig
During the development stage and the following testing phase of the Jero EP Single Jig more than 1000 Epson cartridges were refilled. Thus the refill tool became a very effective assistant. Nevertheless, you as the user should mind a few things. Therefore you should read these instructions thoroughly point by point.
Have fun using Jeros EP Single Jig. You can trust it ... it works!
Please mind the following general advice
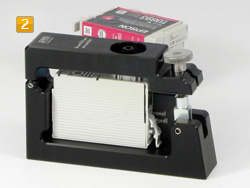
It can not be detected how much ink is left in a cartridge exactly. Therefore it is very important to remove the old ink from the cartridge before refilling it. Otherwise you risk overfilling the cartridge and possible leaking. You can use the EP Single Jig for that (picture 3).
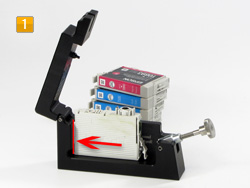
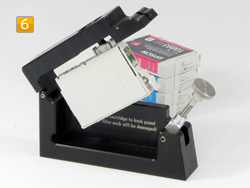
Open the EP Single Jig and insert the cartridge with the ink outlet upwards. Push the cartridge to the back end of the Jig, otherwise the filler nozzle can be damaged when you close the cover.
Important: The nozzle inside the cover of the Jig is a very sensitive component. The manufacturer Jero cannot be held liable for any damage caused by improper or wrong refilling.
Close the cover carefully so that the filler nozzle fits into the ink outlet. Note that tilting can lead to damage. Lock the cover carefully with the knurled screw at the quick acting closure.
In most cases there will be ink left inside the cartridge. Please remove it with the help of the EP Single Jig. That is the only way you can make sure that you do not overfill the cartridge. To empty the cartridge put a syringe on the Jig and place the tool in an angle position (picture 3). Now slowly draw the ink out of the cartridge.
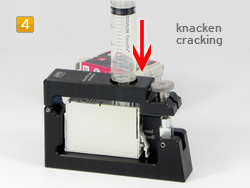
Attention, now there is the cracking!
With the cracking we open the valve inside the cartridge. For this screw a syringe filled with 20ml air onto the connection at the cover of the Jig. Now push the air into the cartridge until you hear a quiet cracking inside the cartridge. You need a bit strength for that. In most cases you hear the cracking when you have compressed the air to 5- 10 ml. Afterwards you can unscrew the syringe.
You need to do this ONLY ONCE for every cartridge BEFORE REFILLING IT FOR THE FIRST TIME.

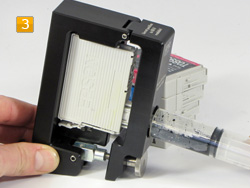
Draw in the according amount of ink into the syringe without air bubbles. Now screw it onto the luer lock fitting in the cover again. Tilt the Jig to the front side and slowly push the ink into the cartridge.
Please do not use universal ink. Epson printers work with a piezo printer head. The wrong ink could damage it.
After refilling put the Jig onto the bottom side again and unscrew the syringe. To remove the cartridge open the quick acting closure and lift the cover.
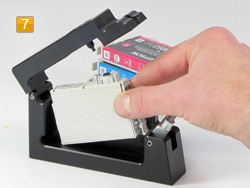
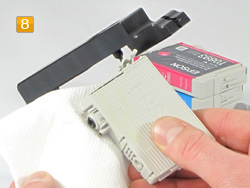
While opening the cover the cartridge remains at the filler nozzle. Be particularly careful removing the cartridge.
Important: The nozzle inside the cover of the Jig is a very sensitive component. The manufacturer Jero cannot be held liable for any damage caused by improper or wrong refilling.

 for Epson 16, 18, 24, 26 cartridges (battery-operated)") Chip resetter (non-OEM) for Epson 16, 18, 24, 26 cartridges (battery-operated)
Chip resetter (non-OEM) for Epson 16, 18, 24, 26 cartridges (battery-operated)
 T0611, T0711, 16, 18, 26, 27 pigmentiert black for Epson") Ink Refill Kit (non-OEM) T0611, T0711, 16, 18, 26, 27 pigmentiert black for Epson
Ink Refill Kit (non-OEM) T0611, T0711, 16, 18, 26, 27 pigmentiert black for Epson