


Instructions for cleaning print heads
A failure to print or a “streaky” print is, in most cases, due to dried up or clogged print head nozzles. The nozzles are tiny capillaries that must be filled with ink. The ink needs an appropriate viscosity and surface tension for the print head. If a printer has been standing for a longer time or was filled with the wrong ink, this changes the mentioned physical characteristics of the ink in the print head. This may result in partial failure or the print head ceasing to work entirely. Our nozzle cleaner is used to remove old ink residues and/or to flush out the print head. The cleaner is designed so that, due to its low surface tension and viscosity, it can penetrate the capillaries and dissolve impurities very well. We recommend different approaches to applying the nozzle cleaner, depending on the cartridge type.
Cleaning permanent print heads
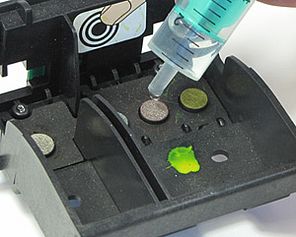
Permanent print heads are permanently installed in the printer and can rarely be removed. The cartridges are the ink tanks used in the permanent print head and can be removed individually (without the print head). After removal of the cartridges, you can clearly see the respective ink receptacles (similar to sieves) for the different ink colours. The print head is supplied with ink via these ink receptacles. To clean the ink receptacles, apply several drops of the print head cleaner until completely saturated (see Figure 1). The cleaner soaks in immediately and spreads through the capillaries. In the case of heavy blockage, it may take a little longer. Allow the cleaner to work for about 10 minutes.
Adding some more cleaner after a while may be necessary. With slightly dried up or clogged print heads, there should already be a visible cleaning effect. Stronger impurities sometimes may necessitate a treating time of several hours.
If you are able to access the nozzle plate of your permanent print heads, you can carefully dab it with a little cellulose cloth. This speeds up the flushing of the capillary.
After cleaning, insert the ink cartridge back into the printer and test the result. Use the cleaning function in your printer menu and then print a test page. The process may have to be repeated.
Cleaning removable permanent print heads
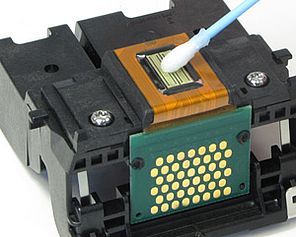
In some printers, the permanent print head can easily be removed. Here you have another cleaning option in addition to the variant described above.
You can put the nozzle cleaner directly onto the nozzle plate (see picture). To do this, it is best to use a cotton swab or apply a few drops of the cleaner.
The cleaner penetrates the nozzle openings and flows into the inner capillary. After a few minutes, it removes the impurities and you can insert the print head into the printer and, together with the ink cartridges, use the cleaning function of the printer.
After that, print a test page and determine the result of the cleaning process.
Cleaning print heads directly installed on the cartridge
When print heads are connected directly to the cartridge body, we also recommend the direct application of the cleaner onto the nozzle plate in the case of slightly dirty print heads.
To do this, use a cotton swab or simply apply a few drops of the cleaner. After 10 minutes of treatment, the smaller residue in the print head should have dissolved.
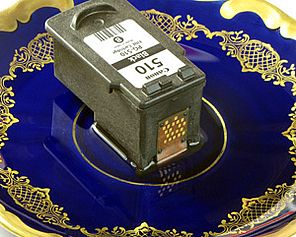
If the test prints are not yet satisfactory, you can soak the print head in the nozzle cleaner on a small plate for several hours (see Figure 3). After that, please remove the print head from the cleaner and wipe off excess cleaner with a handkerchief or something similar.
Note:
Note: After a successful cleaning, there will still be cleaning fluid in the print head. Because it is colourless, it dilutes the strong colour values of the ink. Consequently, your first prints may not have the right colour intensity. In some cases, the correct colour strength comes back only after several printed pages.
If cleaning does not show any positive results, it may be that your print head is defective. In such cases, unfortunately, our cleaner is also of no help.

 Nozzle Cleaner for Brother, Print Head Cleaner with extension
 Print Head Cleaner set for Canon Pixma, Nozzle Cleaner with extension hoses
 Nozzle Cleaner for Epson, Print Head Cleaner with extension
 100 ml Kit Nozzle Cleaner, Print Head Cleaner
 Nozzle Cleaner, Print Head Cleaner
 Cleaner RSL Rinse Solution for the Inside of Printer Cartridges