


Canon Pixma print head cleaning - how to get rid of clogged nozzles?
Clogged nozzles on a Canon Pixma are annoying and running the print head cleaning routine consumes quite an amount of valuable printer ink. We suggest a process to clean the Canon print head as long it is still installed inside the Pixma printer and without wasting any ink.
More recent Canon Pixma models have their print head installed without the feature to take out the print head easily. Especially for these inkjet printers our process is a quick and easy solution.
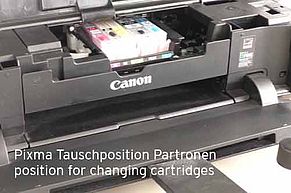
When opening the upper cover on a Canon Pixma printer the print head compartement moves to the position for exchanging the PGI and CLI inkjet cartridges. For our suggested process it is necessary that the print head compartment remains in the exchange position until the nozzle cleaning is finished. To ensure that we unplug the printer´s power cable. Otherwise the print head moves back into its parking position after a certain time automatically despite that the upper cover is open.
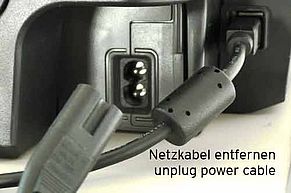
After removing the cable the print head compartment can be moved manually from side to side. This helps to slide a piece of folded kitchen towel under the print head compartment. This absorbent underlay protects the inside of the printer from pollution - it soaks up the nozzle cleaner that exits the nozzle plate while rising the print head. It also wipes the nozzle plate and cleans its surface from dried ink remains.
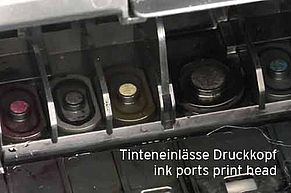
Take out all cartridges from the cartridge compartement. The round ink ports inside the cartridge slots are used to clean the nozzles. This brings back all the colors and removes stripes from Your prints.

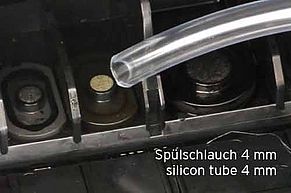
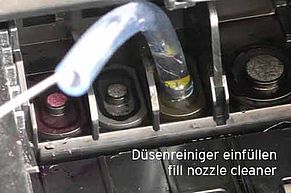
For cleaning the printer nozzles of the CLI Canon cartridges we use a 10 cm long piece of soft plastic tube that has an inner diameter of 4 mm. The plastic tube is pushed on the protruding round ink port carefully. You can do that by hand or it is helpful to push the tube by the help of tweezers.

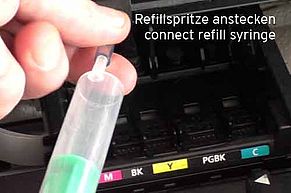
Use a refill syringe and needle to fill print head cleaner into the plastic tube. Then connect an empty refill syringe to the plastic tube. Make sure that there is some air in the syringe. During the cleaning process this air can be compressed and expanded. This way the pressure towards the nozzles in the print heas is not too hard.
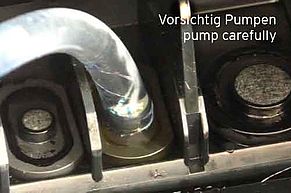
Now pump the syringe´s plunger in and out carefully. This pumping brings nozzle cleaner inside the print head and dissolves cloggings on the way to and in the nozzles itself. As the cleaning effect progresses You can see that the level of print head cleaner inside the plastic tube will go down. Now You can push the nozzle cleaner in carefully to flush the print head and rinse out blockages. Please do not push air into the print head.
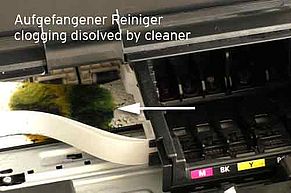
The cleaner plus the dissolved cloggings come out of the nozzle plate on the print head´s bottom side and are absorbed by the paper towel.
When You have finished the cleaning, take out the kitchen towel. Right before pulling out the kitchen towel move the print head from side to side, this swipes the nozzle plate clean once more.
At the end put the PGI and CLI cartridges back into the printer and plug in the power cable.
How to remove the remaining nozzle cleaner out of the print head?
After flushing the Epson print head according to our instruction there will remain a certain amount of nozzle cleaner fluid within the print head, within the printer´s ink system. The safest way for Your printer to get that cleaner out is to print it out. To do so please install regular inkjet cartridges filled with regular inkjet ink into the printer again and start printing a couple of print jobs. It does not really matter what you are printing as long as all cartridges are involved. You also print on already used paper as the print job is just aiming on clearing the print head from the nozzle cleaner and not on producing a nice print out. Keep on printing until colors appear clearly on the print out again. This method of removing the cleaning fluids has the advantage that You do not have the use the printer´s nozzle cleaning function that will pollute the waste ink pad inside the printer unnecessarily.

 Print Head Cleaner set for Canon Pixma, Nozzle Cleaner with extension hoses
 Nozzle Cleaner, Print Head Cleaner
 100 ml Kit Nozzle Cleaner, Print Head Cleaner
") Purified Water, de-mineralized and de-ionized (iter)
Purified Water, de-mineralized and de-ionized (iter)