


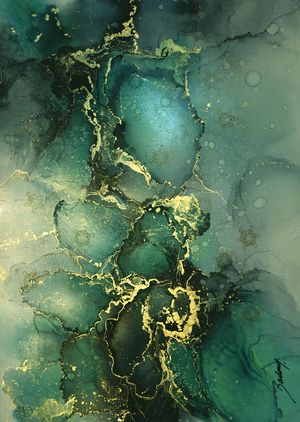
Blown Ink Technique
The following tutorial was created in the course of our calendar project with the linked artist. In addition to this tutorial, there are eleven other techniques around the various applications for alcohol inks. The individual materials, steps and tips were written by the respective artist and summarized by us for the calendar. We hope you have fun trying them out!
Materials used:
- Paper (e.g. AMI or Lanavanguard)
- Isopropanol
- Pipettes
- Mixing pallet
- Hair dryer (cold air)
- Spray bottle
- Brush
- Paper handkerchiefs
- Protective clothing
- UV varnish
Colors used:
Artist: @pictura.andco (link to instagram page)
Blown Ink Technique
Step 1: "Little preparation"
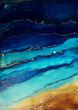
To prepare the work, provide the shades "Deep Sea" and "Midnight", because they represent the month of February in its cold very well. Metallic Inks like "Gold Rush" add shine and volume to the work. Wearing protective clothing is recommended when working with Alcohol Inks. Secure the work area and prepare it to your own standards.
Step 2: "Let's go"
First, place a few drops of Alcohol Ink "Deep Sea" and "Midnight", as well as Metallic Ink "Gold Rush" on the paper. Use the pipette to dilute the ink with isopropanol, then blow on the image with a cold air dryer to distribute the ink. In this way, shapes are created and the colors mix to create exciting patterns. To create transparency and light areas, add isopropanol to the desired areas. Use a brush to direct the flow of Alcohol Inks in a certain direction. Finally, using an atomizer, simply spray some isopropanol over the image, this will create varied round areas which will create an interesting effect when depicting snow or rain.
Step 3: "Let it snow"
If you like, you can additionally embellish the picture with stamps after drying. To do this, fill the opaque ink "Snowflake", which gives it its name here, into a shallow dish, dip the stamp in and add snowflakes or other motifs to the image as desired.
Step 4: "Finish"
Work done with Alcohol Inks must be sealed to prevent damage from handling or UV light, as alcohol inks are very sensitive to light. A coat of alcohol-free UV varnish will help prevent this damage and keep the images brighter and more colorful.
1. To create the illusion of a water surface, work in horizontal lines as much as possible, because they create calm and balance.
2. The final sprinkles can be unintentionally large. Be careful with the amount of isopropanol you have on the brush. It is much easier to add more than to correct too large sprinklers.

 Octopus Fluids Alcohol Ink SNOWFLAKE for fluid art and resin, white
 Octopus Fluids Alcohol Ink GOLD RUSH for fluid art and resin, metallic gold
 Octopus Fluids Alcohol Ink MIDNIGHT for fluid art and resin, black
 Octopus Fluids Alcohol Ink Deep Sea for fluid art and resin, blue