


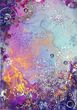
Colorful color rush technique

The following tutorial was created in the course of our calendar project with the linked artist. In addition to this tutorial, there are eleven other techniques around the various applications for alcohol inks. The individual materials, steps and tips were written by the respective artist and summarized by us for the calendar. We hope you have fun trying them out!
Materiali utilizzati:
- Paper (e.g. AMI or Lanavanguard)
- Isopropanol
- Pipettes
- Mixing pallet
- Pencil
- White acrylic paint
- Straw or Air Blower
- Protective clothing
- UV varnish
Colors used:
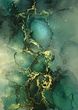
Artist: @alinahacopianart (link to instagram image)
Colorful color rush technique
Step 1: "Color and technique"
First, you decide on a color world. With alcohol inks, this is an important point. Since the structures and shapes are mostly very harmonious anyway due to the medium, it is important to make sure that there are no breaks in the colors. It is equally important to maintain a technique so as to achieve a harmonious result. It can help to very lightly sketch out a shape with a pencil beforehand to get a feel for the composition. This step helps immensely in not feeling that the paper space has been used inappropriately at the end.
Step 2: "Let off steam creatively"
After the workspace has been prepared and protective clothing has been put on, you're ready to go. With this technique, one sets the scene for the rich colors in a targeted manner and thus does not dilute the colors with isopropanol. First, individual drops are applied to the paper. It is important not to put too many drops at once, otherwise the colors will dry. While the colors are still liquid, you take up some isopropanol with the pipette and apply it to the color drops. The alcohol spreads quickly inside the paint drop. You can repeat this process as often as you like and observe the different reactions, such as how alcohol behaves on dried versus wet ink.
Step 3: "Let's make it Golden."
This is probably the most interesting step: now the pigmented alcohol ink finds its use. In this case, "Gold Rush." You put a drop of the pigmented ink on a dried ink field and then drip isopropanol over it. Using a straw, you then blow the individual pigments in different directions. If the pigments concentrate too much on one spot, simply add another drop of isopropanol to this spot and blow the pigments apart again.
Step 4: "The finishing touches"
Finally, the work can be refined with various brushes. These are dipped into the alcohol inks for this purpose, in order to be able to set specific points on the image. This makes the technique look more natural and uncontrolled. Round off with a few dots of white paint and seal the work with a layer of alcohol-free UV varnish.

 Octopus Fluids Alcohol Ink SUNLIGHT for fluid art and resin, yellow
 Octopus Fluids Alcohol Ink LIME for fluid art and resin, green
 Octopus Fluids Alcohol Ink BLUE SAPPHIRE for fluid art and resin, blue
 Octopus Fluids Alcohol Ink EMERALD for fluid art and resin, green
 Octopus Fluids Alcohol Ink Deep Sea for fluid art and resin, blue
 Octopus Fluids Alcohol Ink BLUE OCEAN for fluid art and resin, blue
 Octopus Fluids Alcohol Ink SNOWFLAKE for fluid art and resin, white
 Octopus Fluids Alcohol Ink Inka Gold for fluid art and resin, metallic gold